The Surprisingly Simple Habit that Organizes Your Evernote Account

The top question students ask me is, “How do I organize my Evernote account?”
The truth is, there’s no quick fix 10-step process to prescribe. Every workflow is unique and the flexibility of Evernote creates multiple viable options for organizing anything. However, there are foundational practices you can do that result in an organized Evernote. The best part — you can start today.
What I know from over a decade of coaching users on how to organize Evernote (as well as keeping my own life organized with Evernote since 2010) is that an organized account happens when users do three things:
Master their Evernote Skills: You must comprehend the opportunities and limitations of Evernote as a software tool. Evernote is powerful, and your fluency impacts both the possibilities you see for organizing your stuff and also dramatically affects the efficiency and effectiveness of your workflows. A key part of what I teach in The Academy: An Evernote Training Membership is every feature Evernote offers.
Rely on Search: My students who confidently say, “My Evernote is organized!” all know a secret. You can rely on search as your first line of organization. If you’re doubtful of the power of search, read this: Search…to Organize Evernote? 🤔 (Most Users Miss This).
Consistently Practice Smart Habits. Habits are the secret sauce to creating and maintaining an organized Evernote account, and this blog post dives into the key habit to adopt. When you practice what you learn here in conjunction with the two points above, organization naturally emerges. You don't need to ask, "What notebook do I file these notes in?" or "What tag should I apply to my note?" Instead, the path to an orderly account becomes clear — you just know. And if the structure doesn't yet exist, you simply create it and file your notes there.
52-Card Pickup:
To illustrate the value of the most important habit to practice, let's talk about the game of 52-card pickup.
You may know it — it’s touted as a funny prank where a friend lures you into thinking you’re playing a legitimate card game, only to have this “friend” toss the entire deck into the air, so the cards land strewn across the floor. Your task — pick them up.

Now, let’s assume that to win the game, you must organize the deck of cards in numerical order, by suit, and present them in a tidy deck to your friend.
How simple a task would that be?
The answer depends. How much information is visible to you?
If the cards are all face-up on the floor, the task is fairly simple (albeit tedious). You’d begin by corralling the cards and then you’d start sifting them around, first by suit. Then, when you have four suit piles, you’d order each suit by number before stacking your four piles, squaring the deck, and proudly presenting it to your friend.
But if the cards are all face-down — or some are face-down with others face-up — the task is more difficult. It’s simply not possible to organize the deck without seeing the details on the card faces. You have to flip over every card revealing its face to organize it.
How 52-Card Pickup Relates to Organizing Evernote:
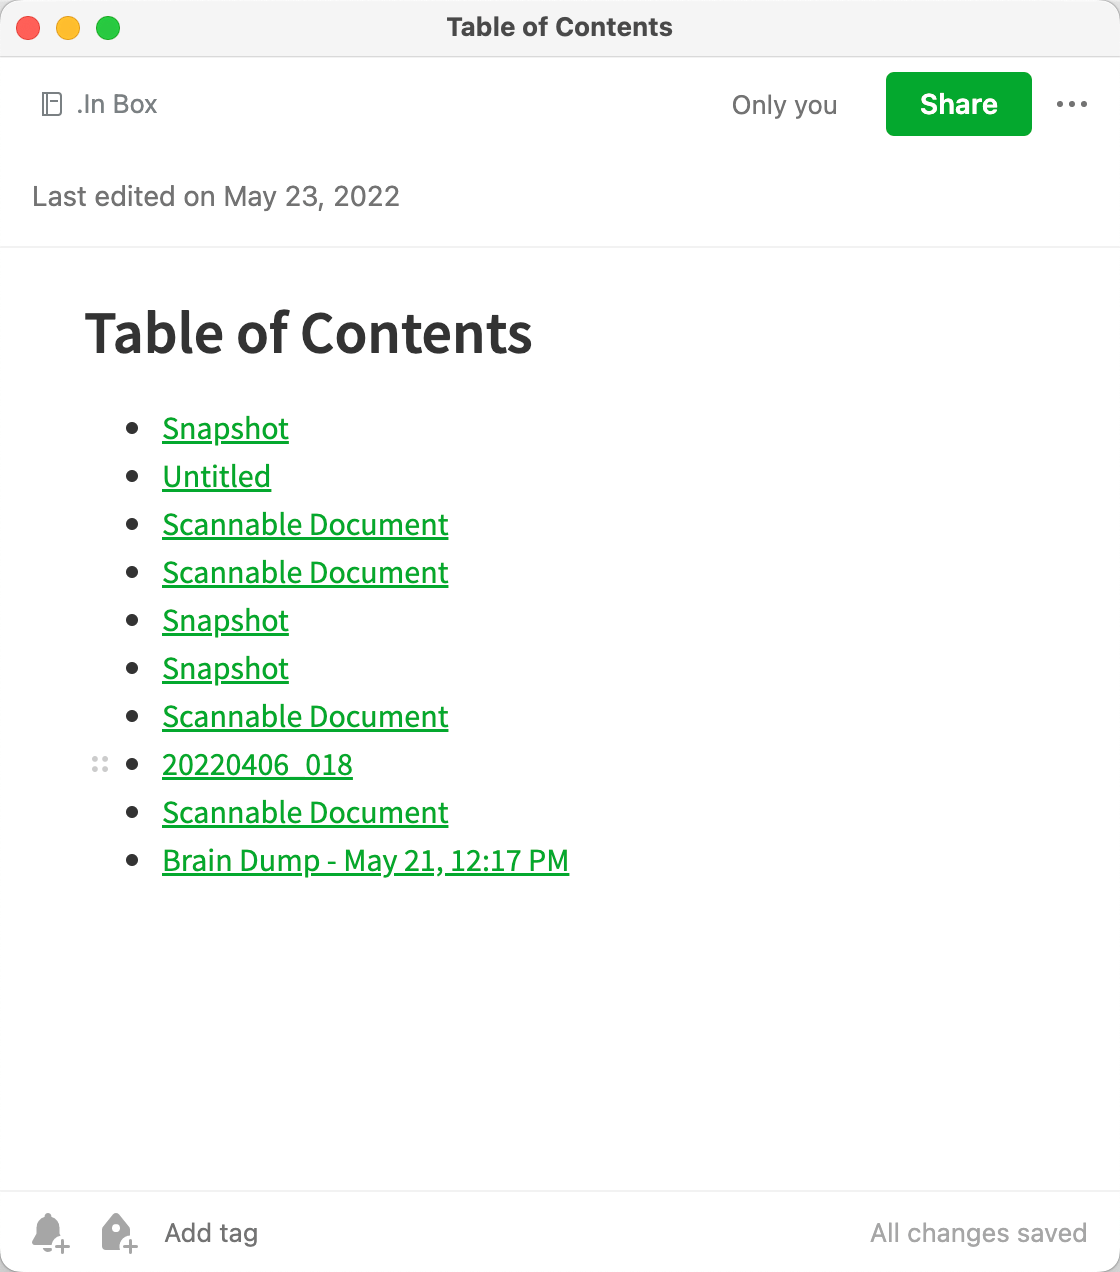
This card game is what happens with unorganized Evernote accounts. You collect everything in Evernote, but it’s a hodgepodge of “cards” (notes) — some face-up and others face-down, with varying amounts of information available to you at a glance.
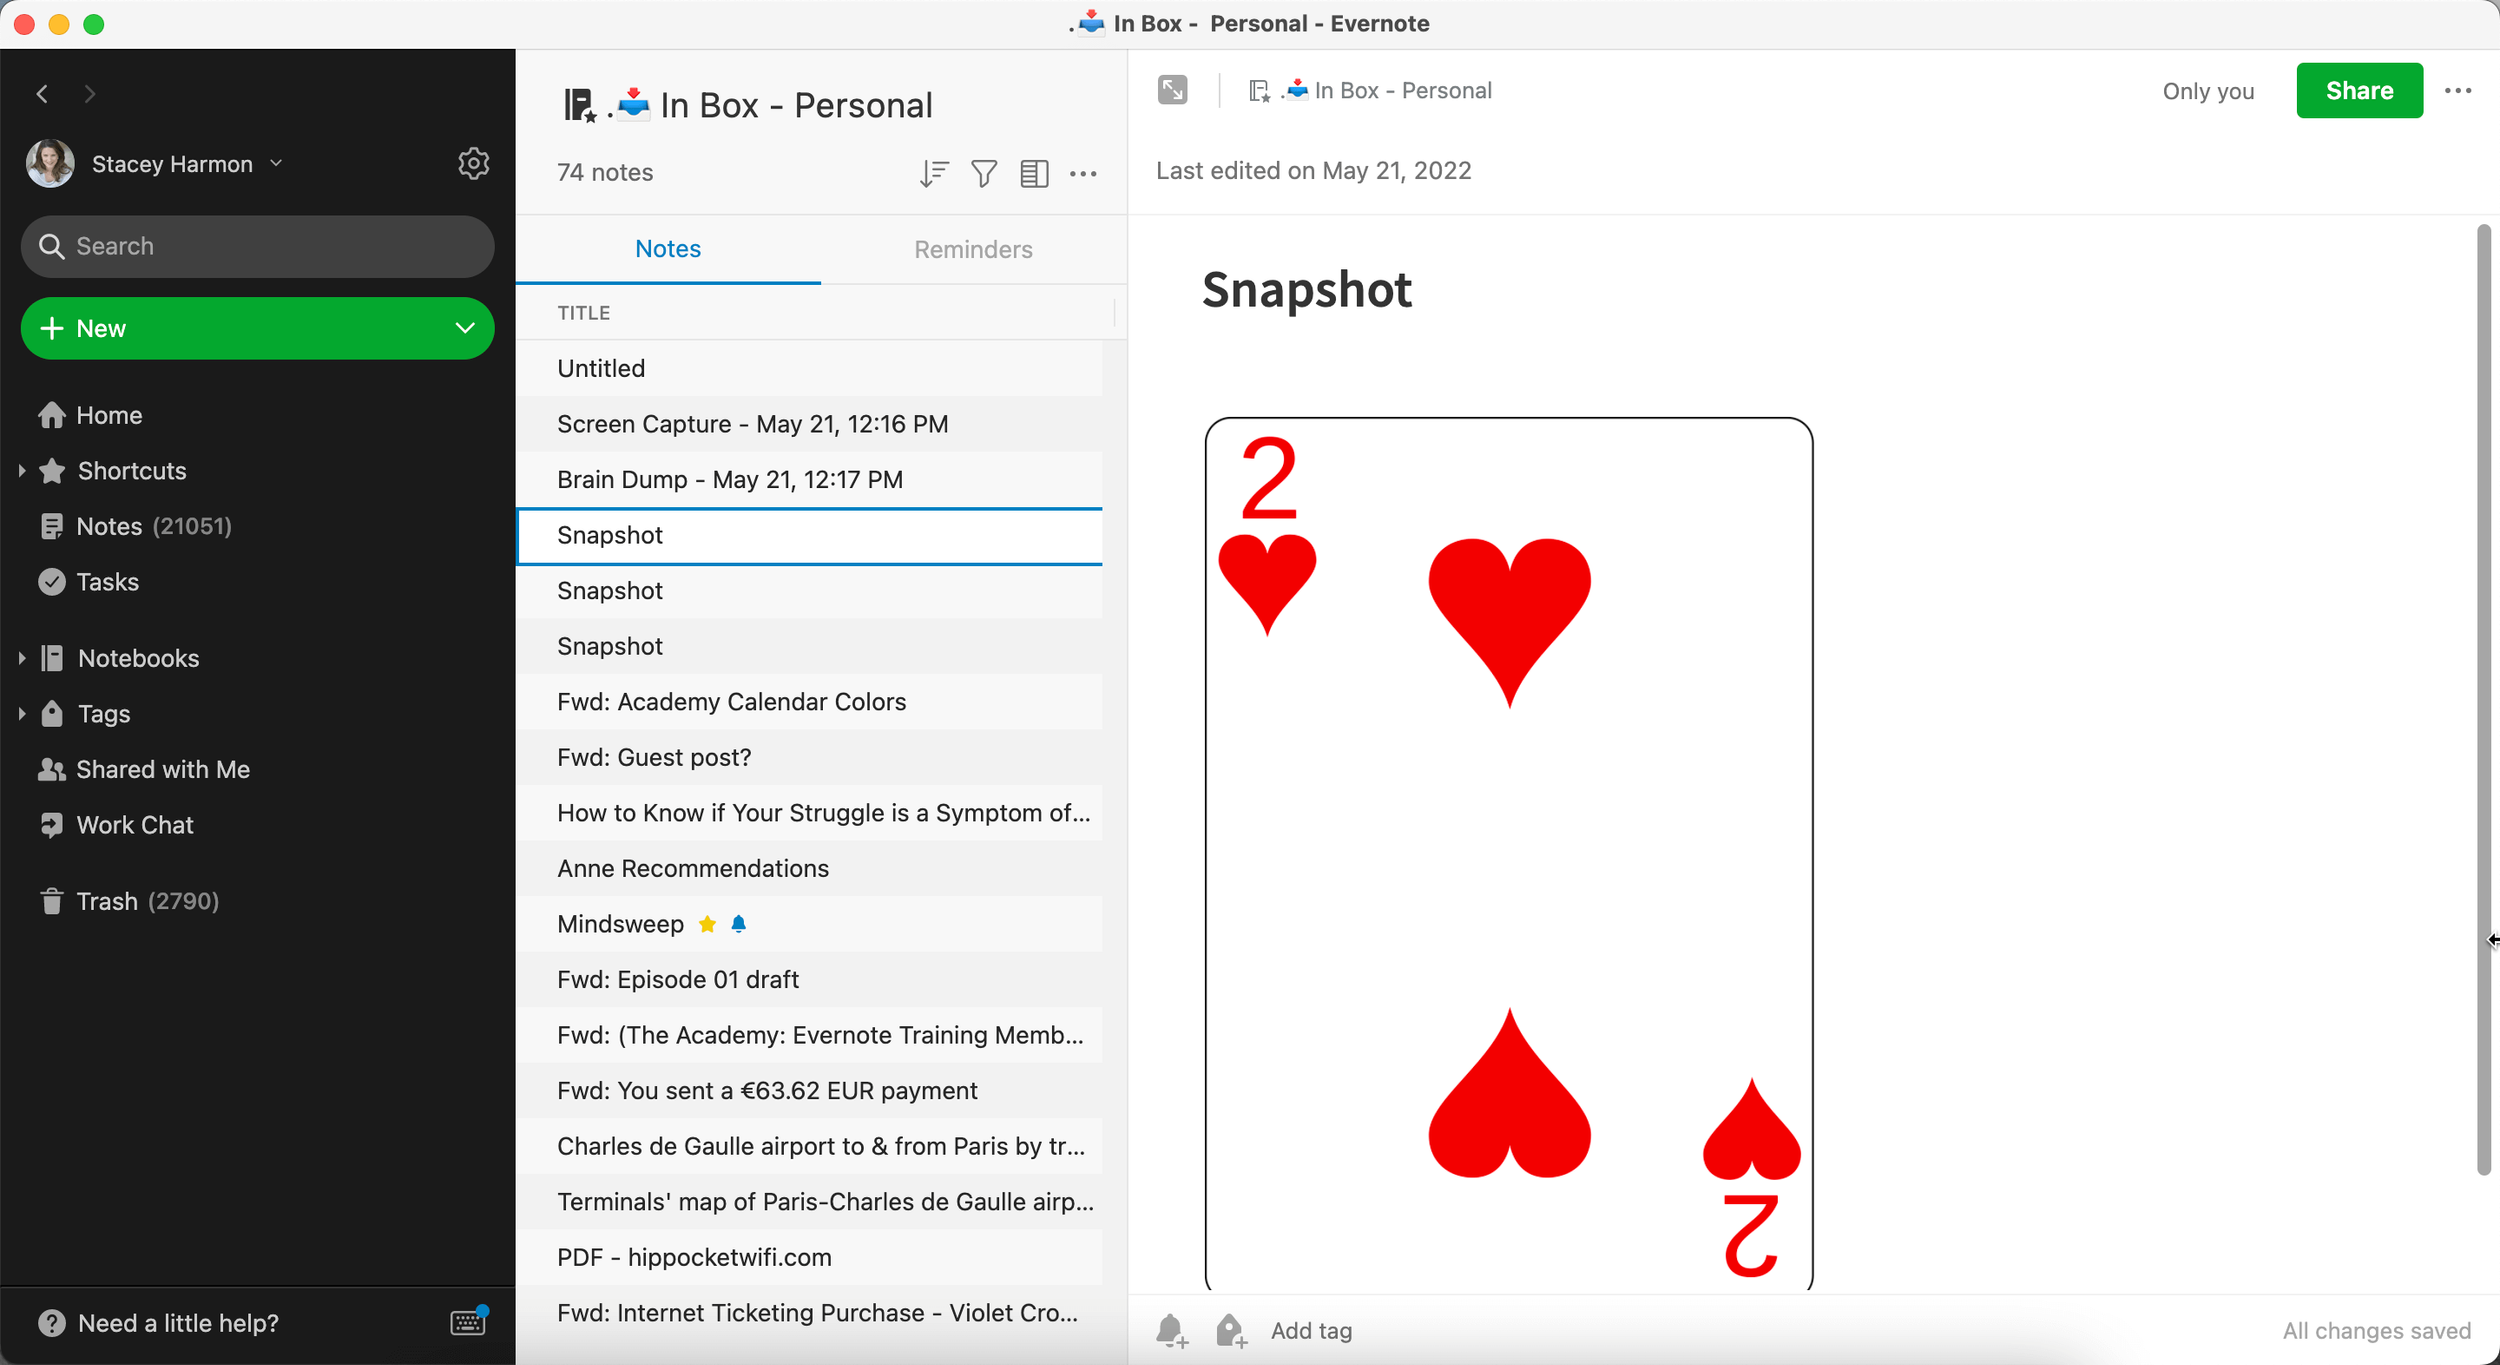
In terms of our analogy, the body of an Evernote note is the face of the card — and when selected in the interface, it’s clear at a glance what it is (the Queen of Hearts):

The Queen of Hearts in the Note Body is visible because this note is selected in the Note List. In this case, the Note Title is “Untitled.”
The challenge is that only one note body can be displayed at a time in Evernote’s interface.
So, when I click on a different note – say the first “Snapshot” in the note list – it’s easy to see that the note body contains the Two of Hearts. But, I also can no longer see – at a glance – that the first Untitled note is a Queen of Hearts. I just have to remember that. Or, click on it again to see it.
Note that if you prefer snippet or card view for your note list, it’s true that a preview of the first image and the first text of the note body will show in the note list. Also, even with an alternate note list view, you still can only display one one in the right note panel at a time.
Titling Your Evernote Notes:
Now, here’s where the habit comes in.
Assume, like me, you’re in the habit of retitling your notes from the auto-assigned, default note title (what’s automatically generated when you create the note), to something more descript.
If you do that for the Queen of Hearts note, check out the subtle, yet significant difference in the interface. Even though I still have the “Snapshot” note that contains the Two of Hearts selected, I can still see that the top note of the note list is the Queen of Hearts. I don’t have to click on it to see the interior contents of the note:

This gives me a lot more information at a glance, and requires far fewer clicks to see what content I have in my account.
The only difference — the Queen of Hearts note has been retitled from “Untitled” to something reflective of the note’s content.
Even if use snipped or card view for your note list, this retitling is valuable as it fuels all the same benefits I dive into next.
A note titling habit changes everything.
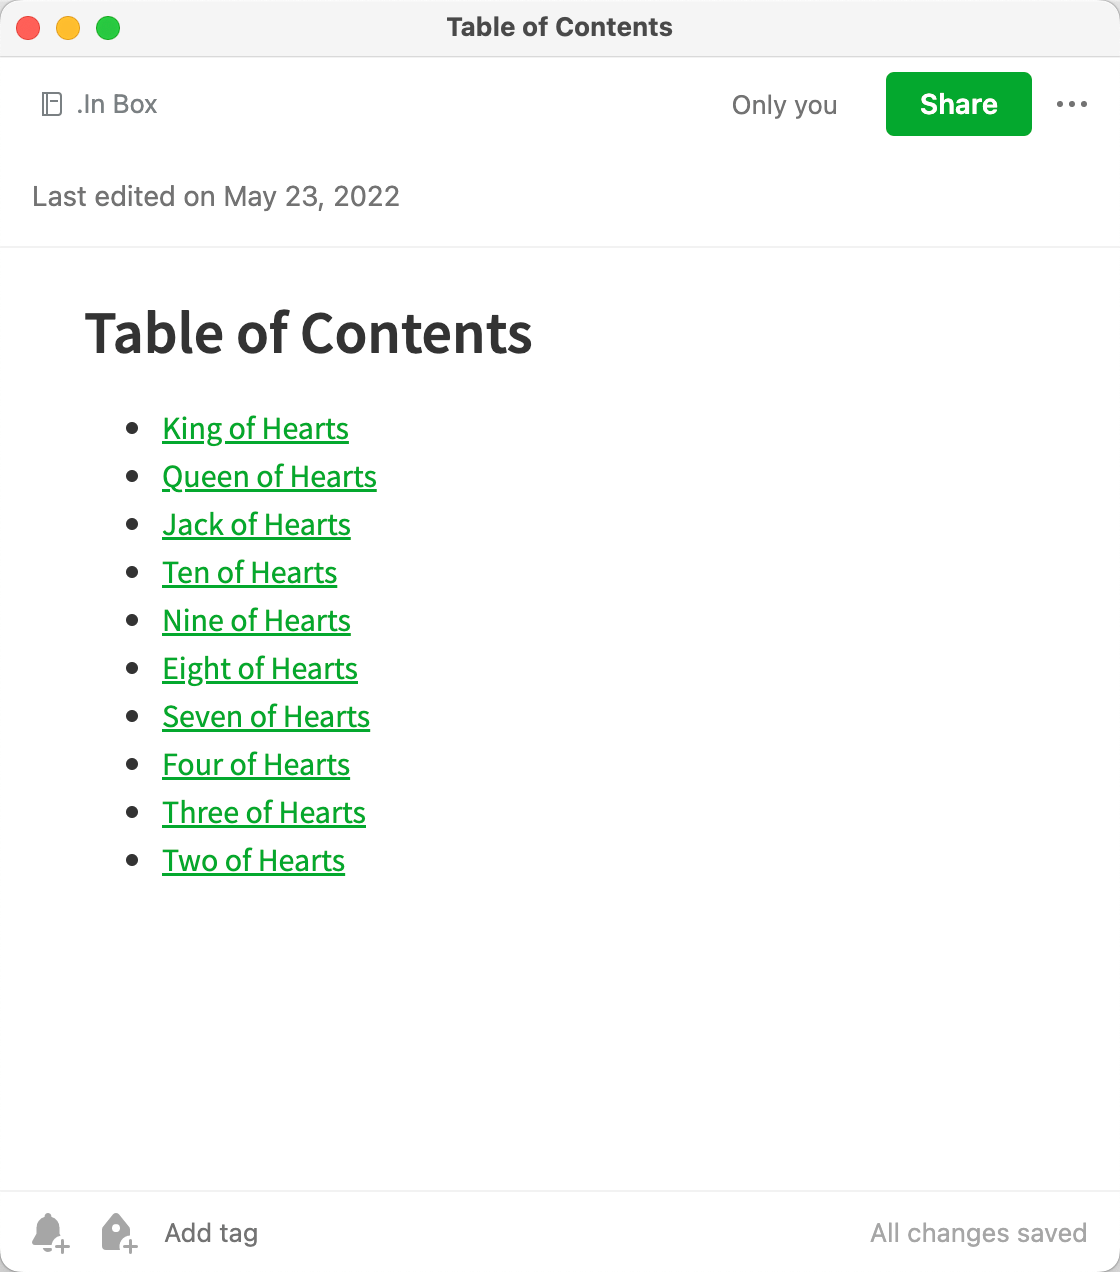
When you give your notes a meaningful title — one beyond the default title assigned when it’s created — all the cards on the floor (all the notes in your account) get turned face-up. And, when you can see what’s on the face of the cards, you can’t help but know how to organize them.
Remember, to win this game of 52-card pickup, you have to return the cards to an organized state — by suit in numeric order. This is a simple task when all the cards are facing up. Your brain can’t help but see all the hearts, diamonds, clubs, and spades and it effortlessly begins to organize the deck.

Similar note types groups together when consistent naming conventions are applied and the note list is sorted by title. It’s clear that the first five notes are all receipts and you should move the notes into a “Receipts” notebook — either individually or with a batch move (power users know how to select and move all four at once using just the keyboard).
Same thing in Evernote.
When all your notes have a meaningful note title, your mind can’t help but see notes that are alike. For example, you’ll instantly see:
All those business receipts titled with the vendor name and date of purchase — your brain knows they should all be placed in your receipts notebook.
All the notes related to your upcoming trip should go in the trip notebook you’ve created. This makes perfect sense to your brain.
All the notes from meetings with your boss — seem logical to collect them in a notebook called: “Meetings with Kris”?
Keep this note titling habit up, and suddenly, your Evernote account practically organizes itself.
All because you did one little thing — you changed the default note title, to something descriptive of the content within the note.
Beyond revealing the contents of your notes at a glance, which lets your brain effortlessly identify and group like information together (i.e., organize your account), there are several other benefits to this habit as well.
Returning to the three things it takes to maintain an organized account — Evernote Skills, Search, and Smart Habits — when you combine all three, the power of the note title habit multiplies.
The first two — Evernote Skills, and Search — are about your Evernote fluency. And integrating smart habits like note titling sets you up for massive efficiency with other Evernote features.
Let’s look at a few…
More Effective Search
Once you start habitually titling your notes, you set yourself up for search success.
Of course, Evernote indexes both the body and the title of the note — and if Evernote indexes it, Evernote can find it.
But, when you assign a title to a note, the words you choose typically reflect the words your future self will think to use when searching for that note — even years down the road. When you title your note, you’re adding relevant keywords — ones that are relevant to you, and likely what you’ll think of to search for down the road.
So, by tilting the note, you’ve set both your short- and long-term future self up to retrieve the note by putting your keywords in the title.
Faster Find
Titling your notes results in “cards that are face-up” when you do a search too. Searches will result in a keyword-rich and descriptive note list of matching notes. No need to click on the note title to view the contents — your eye will quickly see from the note titles exactly what it’s looking for.
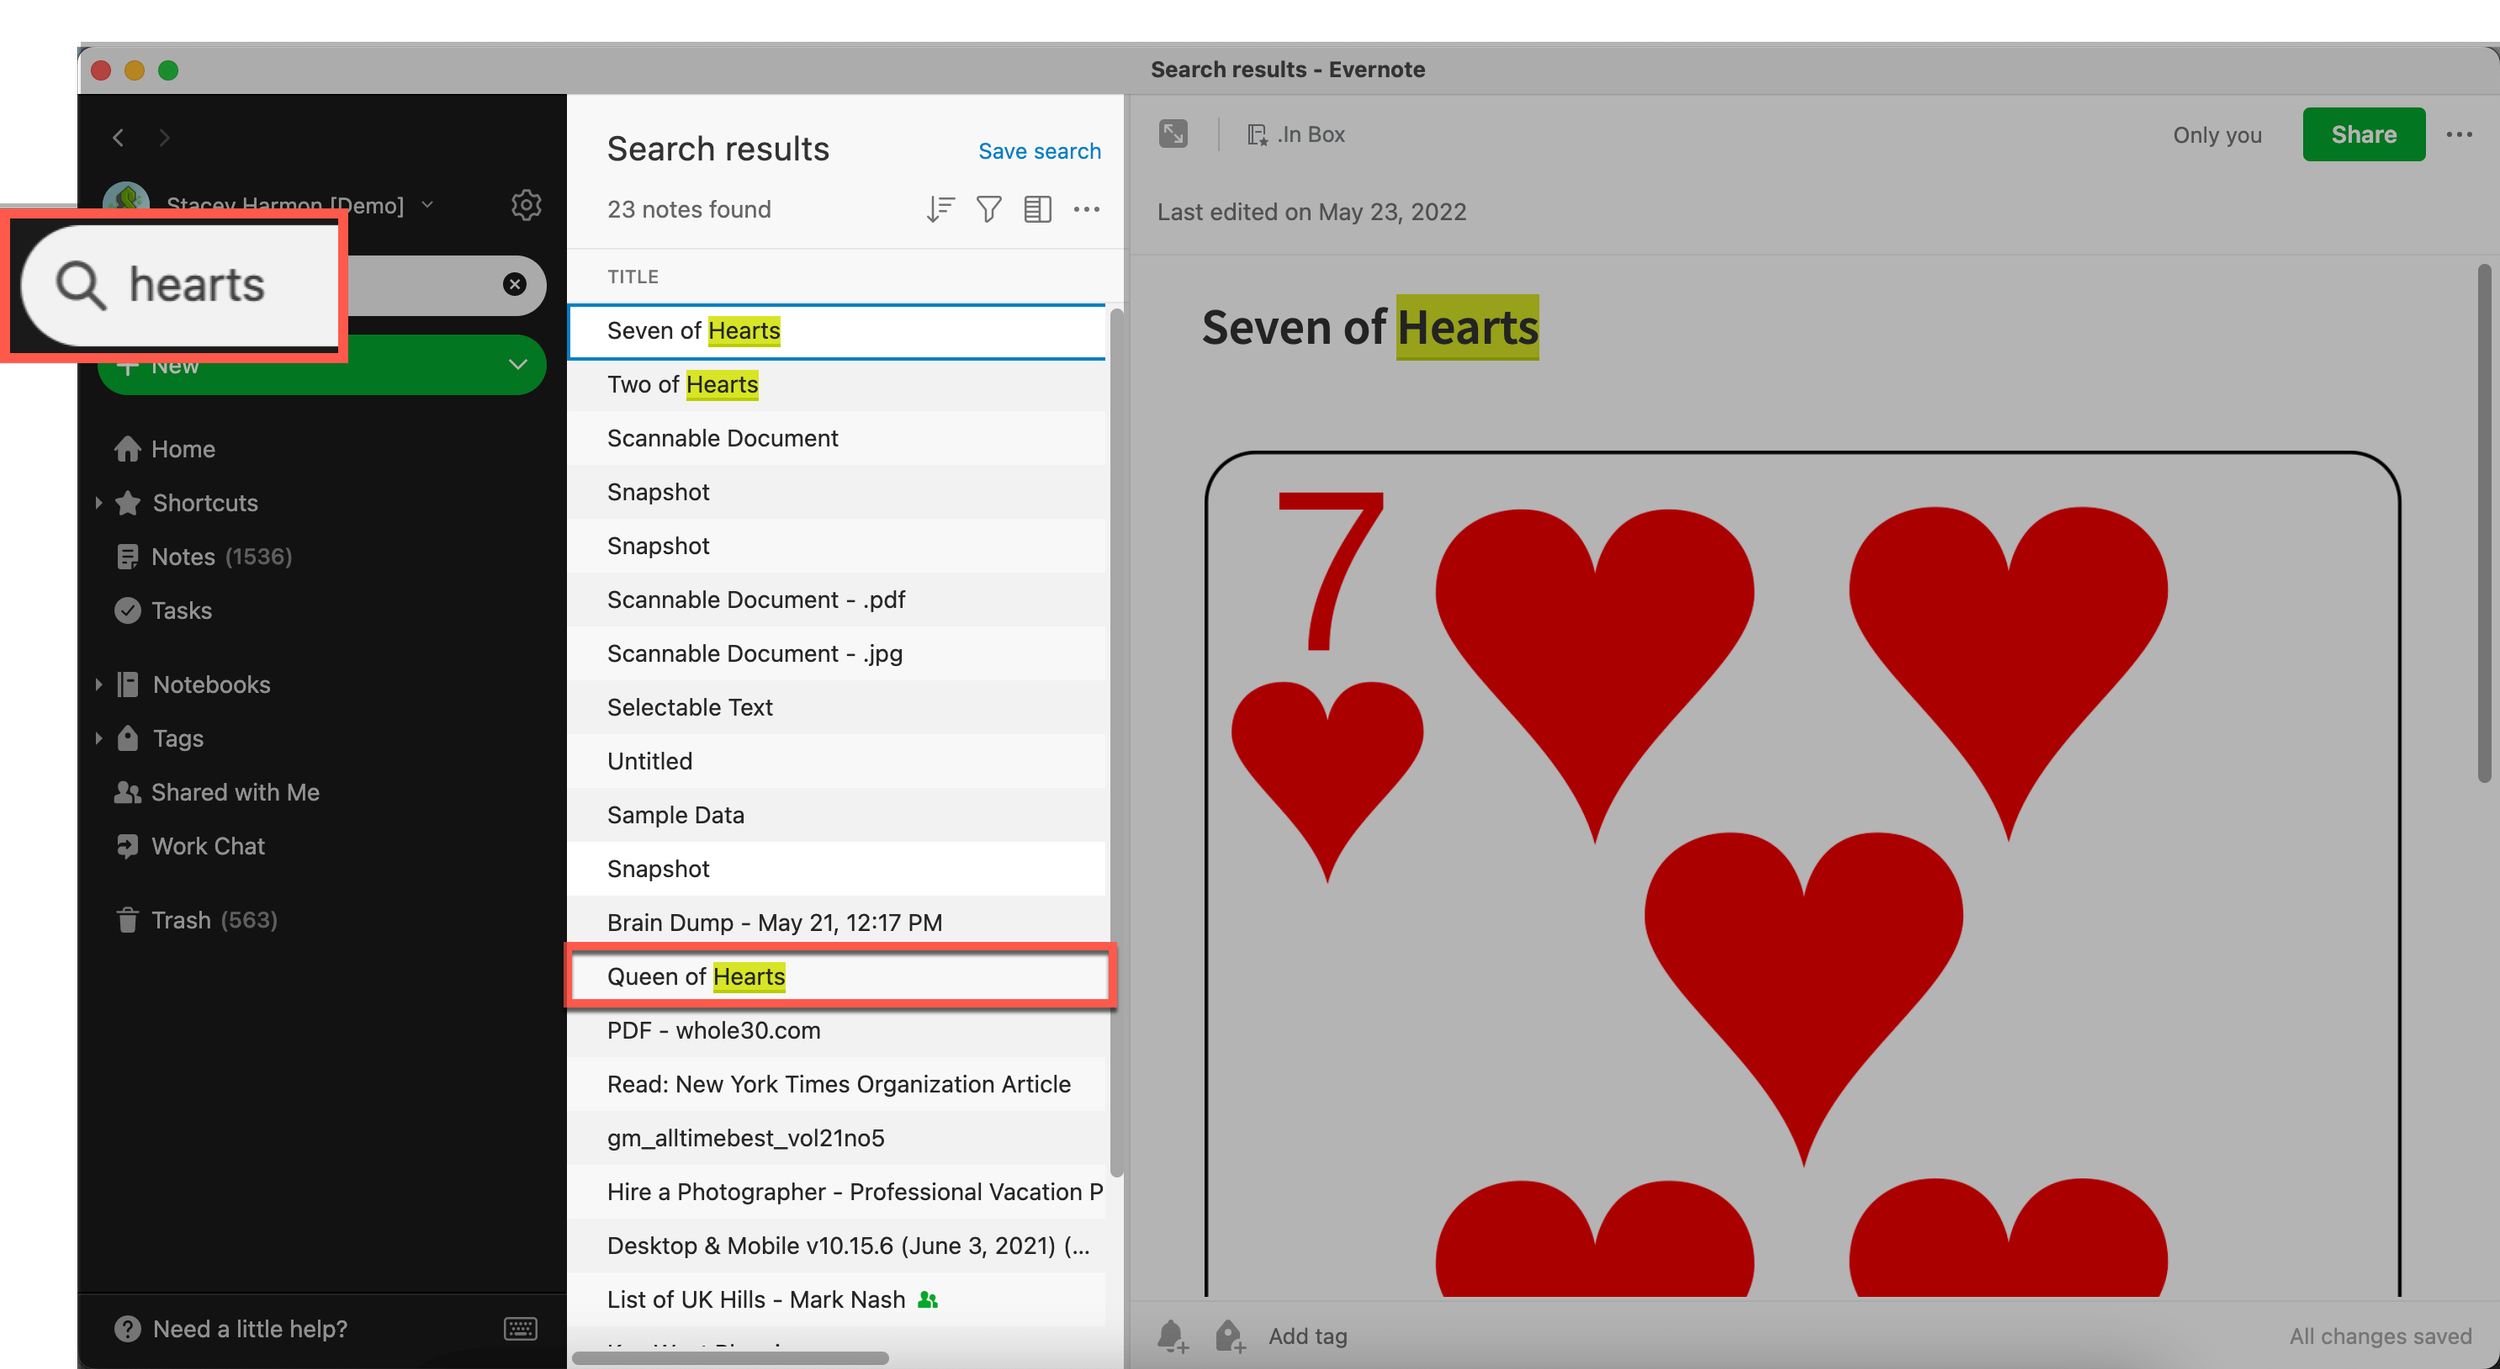
For example, say you're looking for the Queen of Hearts note in your account. A search for “hearts” surfaces 23 notes that contain that word somewhere in them.
Note how you can see the Queen of Hearts note in the search results list. You can go right to it, even though the interface has the Seven of Hearts card displayed:
Contrast this to if you run the same search (“hearts”), but this time, you’re trying to locate the Six of Hearts, which retains its default note title. Evernote finds this note too (as it should — the word “hearts” is in the body of the note), but, it’s not possible to identify at a glance the cards (notes) that aren’t face-up in the interface (i.e., have non-descript note titles).
To surface the Six of Hearts, you’d need to click on each of the 23 matching results until the note panel displays what you’re looking for:

The only way to see that “Untitled” is the Six of Hearts is to click on it.
Easier Advanced Search
Descriptive note titles enable you to benefit from advanced Evernote features such as “intitle:” search which finds notes that only match the searched term in the title of the note (it excludes the body of the note from the search). Long time Evernote users know this is very practical when you have a large volume of notes in your account and want to refine your search.
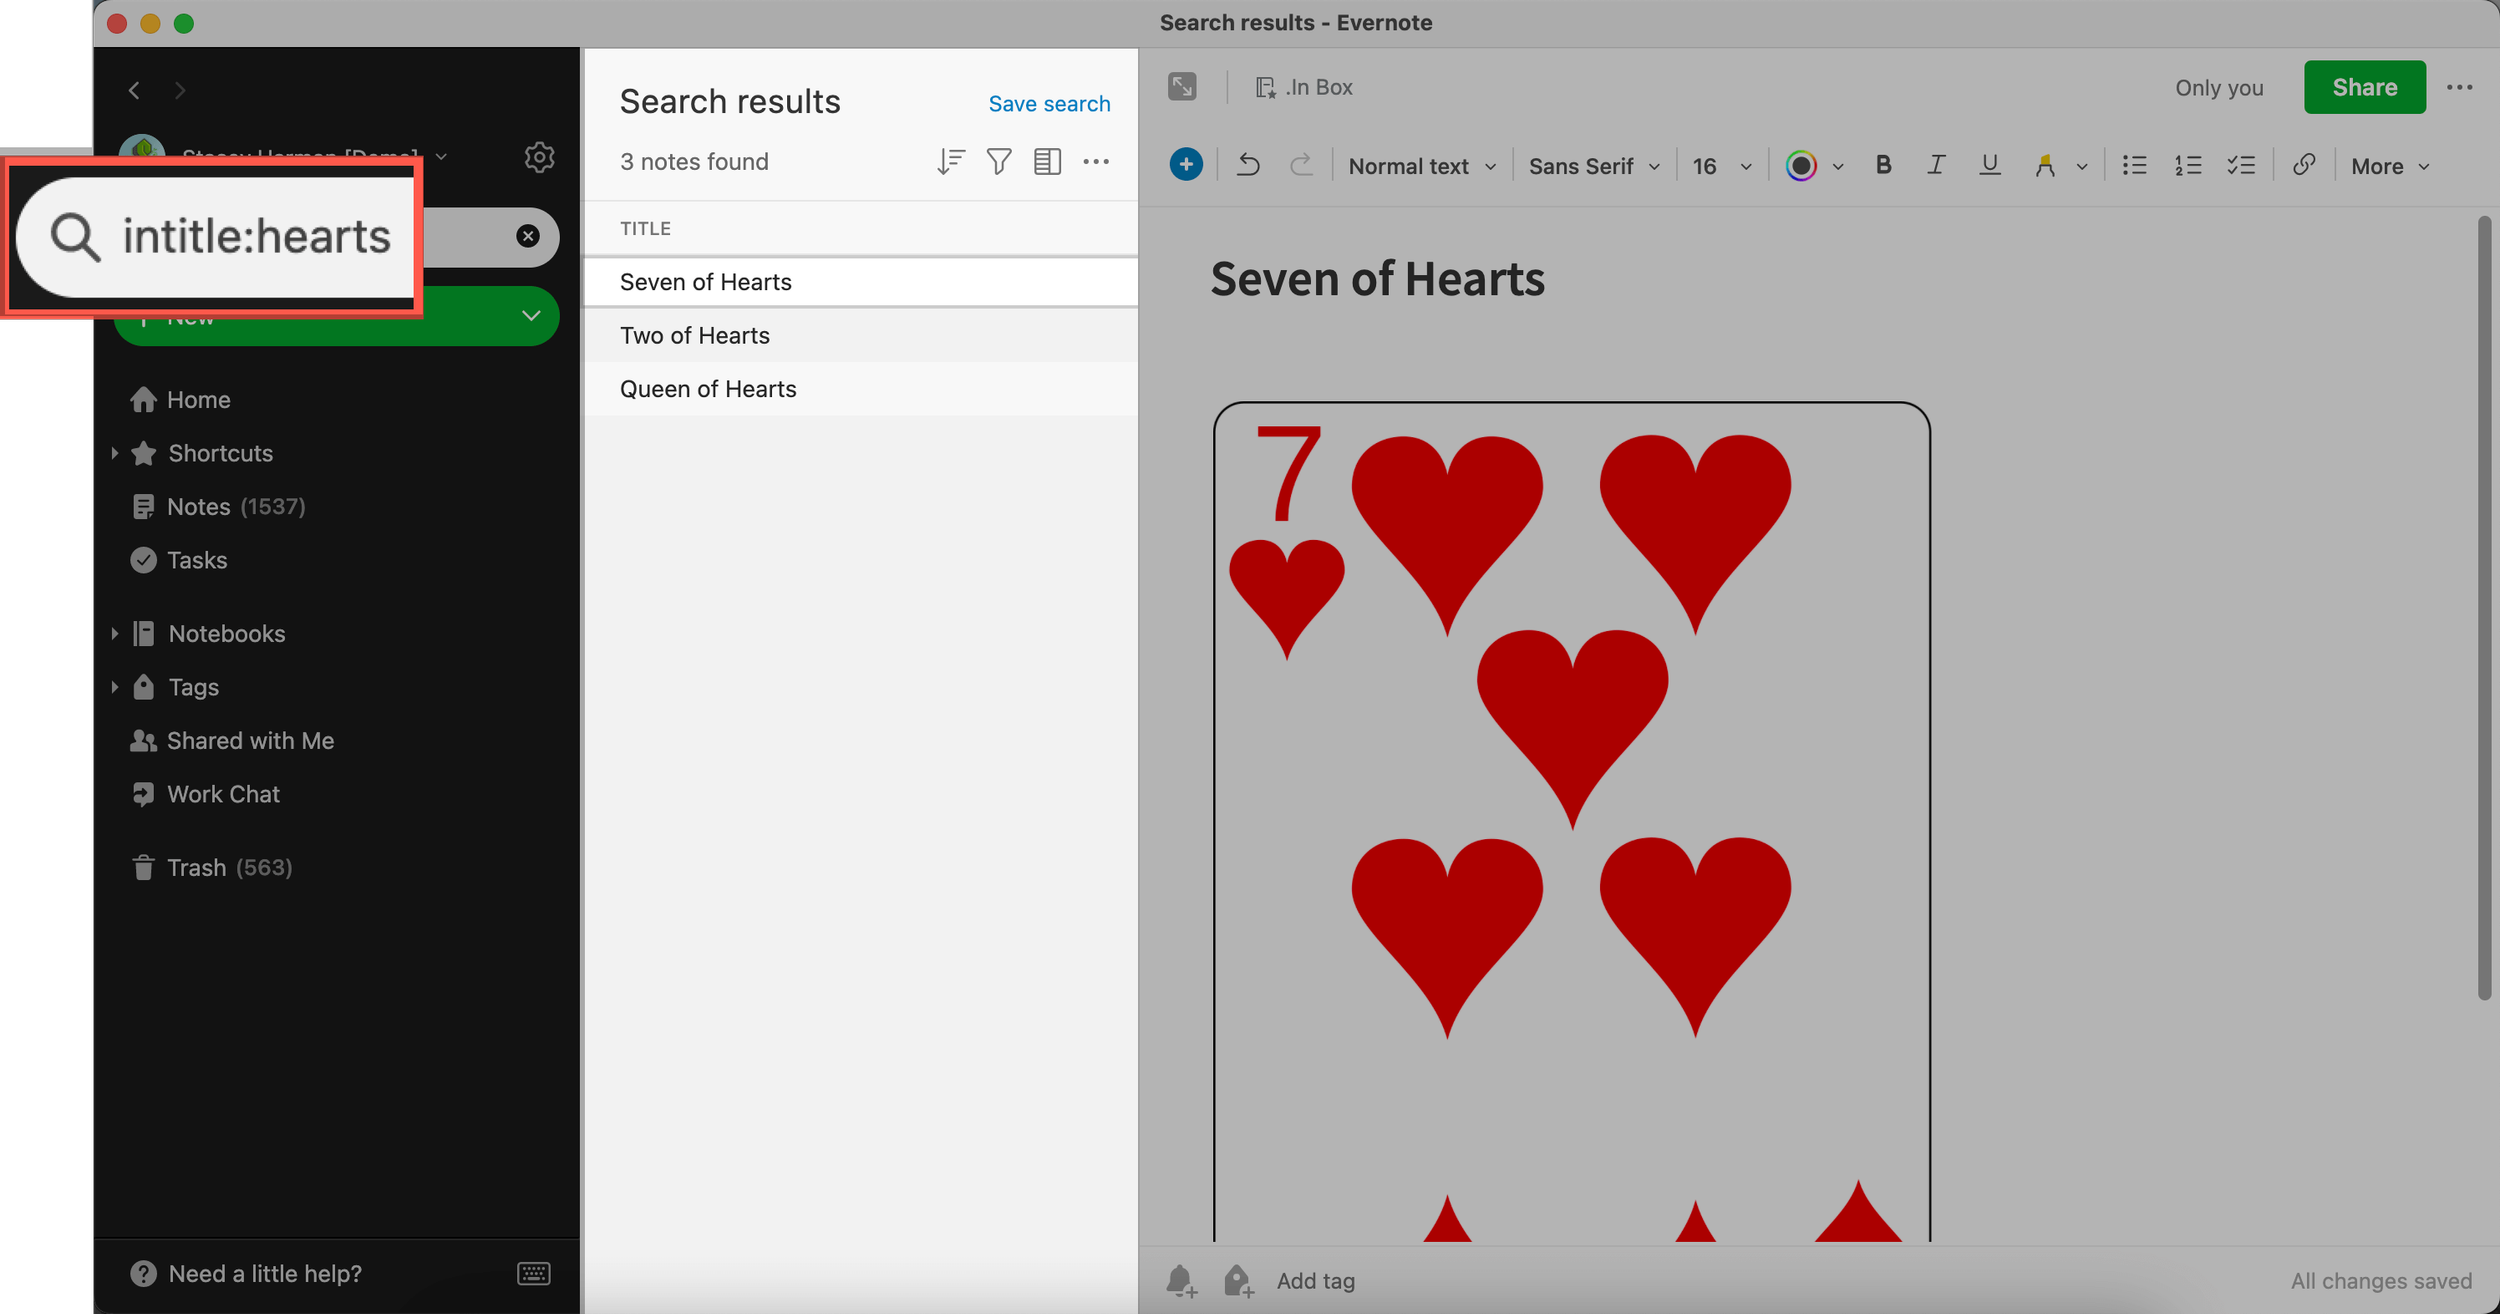
“intitle:hearts” search returns 3 notes vs the 23 found with search “hearts”
Quicker Navigation
Descriptive note titles also supercharge what you can do with the keyboard command Switch to… (a power user favorite).
When you add keywords to your note title you can jump right to specific notes that match your search term from anywhere in your account. Once you get this, it’s a game-changer (and, my favorite lightbulb moment reported by Academy members who watch me effortlessly navigate around Evernote during live events).
This video shows Switch To… in action. Note that because “hearts” appears in the note title, you can navigate to it from wherever you are in your account using a key command (Cmd+J on Mac and Ctrl + Q on Windows). Note also that the Six of Hearts doesn’t appear — it still has its default note title of “Untitled.”
More Logical Links
Note links — the feature which transformed how I use Evernote — are most powerful when you have purposely titled your notes. Why? Because the note title becomes the note link text that is displayed.
Here’s an illustration: The image on the left shows you notes with default note titles — not super useful. You have to click on each link to know what's in the body of the note. The image on the right, however, reflects the same notes retitled. Here, you know exactly what you’ll find when you click on the link. It’s much clearer and more efficient.
Tips for Titling Your Notes
Now that you see the power in titling your notes, you might be wondering: ”What should my note titles be?”
Unfortunately, there’s no formula. Organization means that the structure works for you and things appear where you expect them. This is personal to each individual and each workflow, but here are some tips to help you out:
1: Look at the note and ask yourself: “What is this?”
Type the answer to that in the title of the note. This is likely what your future self will search for.
2: Start with Note Titles (not Naming Conventions)
Note titles and naming conventions are different things.
Note titles are easy — just put descriptive words reflective of the note contents in the title of your note.
Naming conventions, on the other hand, are often intimidating and trip a lot of users up.
Naming conventions are an advanced form of note titles that bring a specific, consistent order to your note titles. They’re like a template for your note titles and are a power user skill applied to an established note titling habit.
Don’t fall into the trap of thinking you have to have naming conventions applied to your notes. Relevant note titles are more important than perfect naming conventions.
Start with generating a purposeful note title. Over time, as you become more comfortable with the note titling habit, naming conventions emerge. And, you can refine your note titling habit by adding naming conventions skills at any time. But, you’ll still benefit from what I’m teaching here in this blog, even without the naming convention.
3: Ease into naming conventions
Over time, notice if you regularly collect multiple notes related to specific topics — for example, articles to read, recipes, meeting notes, etc. If so, these categories are good candidates for creating a naming convention and applying it consistently to your notes.
Here are a few examples from my own account:
Receipts have the naming convention: <date> Vendor.
Journal entries all begin with the naming convention: Journal: <date>
For notes related to trips, I start certain notes with “Flight: “ or “Hotel:” or “Tickets:” or “Activity:”
Take Action
You can start this habit right now. It’s not hard.
Remember the key is to do one thing — title your notes — on a regular basis.
It’s a habit. And it doesn’t take long. And the results are powerful.
When you consistently title your notes, organization in your account emerges — and is maintained.
Try it out today.
Get support in forming this habit and learn the essential skills for an organized Evernote account inside the Academy.